Enriching the client's identity: Customer Identity and Access Management (Spanish)
Thursday 24 November 2016
Enriching the client's identity: Customer Identity and Access Management
Monday 4 January 2016
Creating a new site in WebCenter Sites
This post describes briefly how to create a new site in WebCenter Sites, including users and roles creation.
1. Create users:


2. Create Site:

3. Enable Asset Types: The new site needs asset types.


4. Create Roles:


5. Add users and roles to the site:


6. Grant site permissions to the new roles.


7. Testing the new site permissions:

After performing these actions, developers can start to create the elements of the new site in WebCenter Sites. The permissions of the different groups of users should be adjusted during development process to meet the needs of the team.
1. Create users:
- Login to WC Sites Console as administrator.
- Navigate to Admin tab, User Access Management, User.

- Enter the name of the user to be created and select the "Add user option".
- Click OK.
- In the next screen, select the Access privileges (ACLs) and password. In this case, the users are going to be contributors, so they will have the following ACLs: Browser, ElementEditor, ElementReader, PageEditor, PageReader, UserReader, Visitor, VisitorAdmin, xceleditor

- Click Add and repeat the process for all the users to be created.
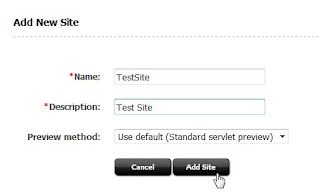
2. Create Site:
- In the Admin tab, navigate to Sites, Add New.

- Enter Name and Description and accept the default preview method.

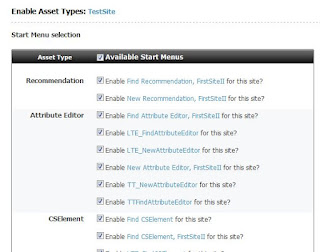
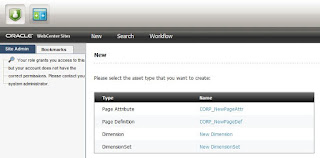
3. Enable Asset Types: The new site needs asset types.
- In Sites, navigate to the new site, Asset Types and click Enable.

- In this screen select all the asset types that are going to be used in this site. For example: Recommendation, Attribute Editor, CSElement, Collection, Device, Device Group, Dimension, DimensionSet, History Attribute, History Definition, Link, Page, Page Attribute, Page Definition, Page Filter, Promotion, Query, Visitor Attribute, Segment, SiteEntry, Site Plan, Template, WebRoot.

- Click on Enable assets
- Select "Available Start Menus" and then "Enable Asset Types".

4. Create Roles:
- Navigate to Admin, User Access Management, Roles.

- Click on Add New.
- Enter Name and description for the role.

- Click "Add New Role" button.
- Repeat the process for other roles that might be needed for this site.
5. Add users and roles to the site:
- Navigate to Sites and expand the recently created site.
- Click on Users and enter the name of the user to be added.

- Click on the Edit icon for the user.

- Select the roles that the user will have in this site and save changes. For example: AdvancedUser, SiteAdmin, SitesUser, TestContributor.

- Repeat for other users.
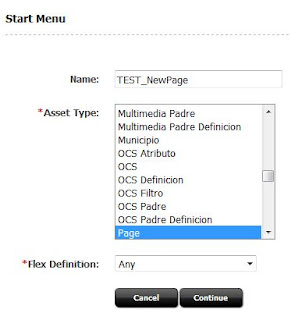
6. Grant site permissions to the new roles.
- Navigate to Start Menu, Add New.

- Enter a Name and select the asset type permission that is going to be granted to the role. In this case, it is going to be a New Page grant.

- Select the Type (New), the new site and the role that will have permissions for this action.


- Save and repeat the action for other operations, typically this task is performed for pages, page attributes and page definitions; each of them with grants for New and Search actions (Type selector).
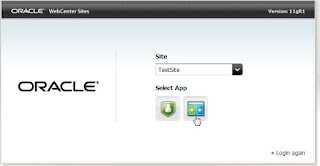
7. Testing the new site permissions:
- Login as one of the new users.
- Select the new site from the selection list and click in the Contributor icon.

- In the Content tab, select New and the list of objects that can be created in Contribution mode is displayed.

- Click on the Admin icon in the top hand left corner of the screen.
- The list of Admin components is shown.

After performing these actions, developers can start to create the elements of the new site in WebCenter Sites. The permissions of the different groups of users should be adjusted during development process to meet the needs of the team.
References
Friday 4 December 2015
Managing WebCenter quality code with Sonar
Ensuring the quality of the code in Oracle WebCenter implementations is a requirement by some clients and a recommendation for project managers. The most widely used tool for managing quality code is Sonar, an open source software that meets most of the requirements. In this post the process of integrating WebCenter application with Sonar is briefly explained.
1. Download Oracle XE database.
2. Install database.
3. Connect as sys user and create an user for Sonar application.
4. Grant all privileges to this user.
NOTE: Sonar will not execute correctly if there are two SonarQube schemas in the same database instance.
1. Download SonarQube.
2. Check the requirements, basically it does not work with JDK 6 or below.
3. Unzip the package to a directory of your choice.
4. Edit the file \conf\sonar.properties, setting the following parameters:
#Database user for Sonar:
sonar.jdbc.username=sonarqube
sonar.jdbc.password= <DB_password>
#Database connection URL:
sonar.jdbc.url=jdbc:oracle:thin:@localhost:1521/XE
#Local host and port:
sonar.web.host=localhost
sonar.web.port=9000
#Context root:
sonar.web.context=/sonar
5. As Oracle database is used, the OJDBC driver must be downloaded.
6. Copy the "ojdbc6.jar" file to the \extensions\jdbc-driver\oracle folder.
7. Run the "StartSonar.bat" file (Windows), located under the bin directory.
8. The properties are loaded and a message will notify that the process is up.
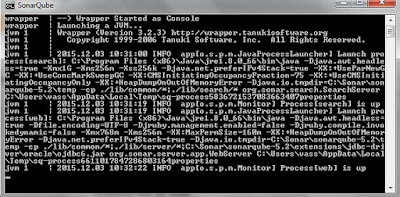
NOTE: If java version error is prompted, ensure a compatible Java installation is set in the JAVA_HOME environment variable.
9. Check the installation by opening a browser and introducing Sonar URL:
http://127.0.0.1:9000/

1. Download SonarQube Scanner launcher.
2. Uncompress the package in a folder of your choice.
3. Edit the \conf\sonar-runner.properties file.
#Default SonarQube server
sonar.host.url=http://localhost:9000
sonar.jdbc.url=jdbc:postgresql://localhost/sonar
#Database settings:
sonar.jdbc.url=jdbc:oracle:thin:@localhost:1521/XE
sonar.jdbc.username=sonarqube
sonar.jdbc.password=<DB_password>
#Sonar credentials (by default admin/admin):
sonar.login=admin
sonar.password=admin
NOTE: It is important to assign the same port and context that were configured previously in the sonar.properties file.
4. Add to the 'path' environment variable the location of Scanner bin directory. Ex: C:\Sonar\sonar-runner-2.4\bin
5. Check the installation by opening a command window and running sonar-runner.bat

1. Navigate to your WebCenter application folder. Ex: C:\JDeveloper\mywork\CoherenceApp
2. Create a file named "sonar-project.properties".
3. Edit the file using this template and updating the values:
# must be unique in a given SonarQube instance
sonar.projectKey=CoherenceApp
# this is the name displayed in the SonarQube UI
sonar.projectName=CoherenceApp
sonar.projectVersion=1.0
# Path is relative to the sonar-project.properties file. Replace "\" by "/" on Windows.
# Since SonarQube 4.2, this property is optional if sonar.modules is set.
# If not set, SonarQube starts looking for source code from the directory containing
# the sonar-project.properties file.
sonar.sources=.
# Encoding of the source code. Default is default system encoding
#sonar.sourceEncoding=UTF-8
4. After saving the changes, open a command window and navigate to the directory of the application where the file was created.
5. Execute the command 'sonar-runner'.


6. Open the Sonar URL and login as administrator user.
7. The new project would appear in the Project dashboard.

8. Click on the project link and check the issues, which are classified depending on the severity.

9. Repeat the previous steps for all the WebCenter applications that you wish to analyse.
NOTE: In my case, I found problems with Serializable and Log errors, Sonar marked this type of errors although the code was perfectly compliant.
Oracle Database 11g Release 2 JDBC Drivers
Oracle XE Download page
Sonar
SonarQube Download page
SonarQube Installing the server
SonarQube Requirements
SonarQube Scanner Installing and configuring
Creating database schema
Firstly, a database schema is needed for storing Sonar diagnostics:1. Download Oracle XE database.
2. Install database.
3. Connect as sys user and create an user for Sonar application.
4. Grant all privileges to this user.
NOTE: Sonar will not execute correctly if there are two SonarQube schemas in the same database instance.
Installing SonarQube
Once database is configured, the Sonar installation can be started:1. Download SonarQube.
2. Check the requirements, basically it does not work with JDK 6 or below.
3. Unzip the package to a directory of your choice.
4. Edit the file \conf\sonar.properties, setting the following parameters:
#Database user for Sonar:
sonar.jdbc.username=sonarqube
sonar.jdbc.password= <DB_password>
#Database connection URL:
sonar.jdbc.url=jdbc:oracle:thin:@localhost:1521/XE
#Local host and port:
sonar.web.host=localhost
sonar.web.port=9000
#Context root:
sonar.web.context=/sonar
5. As Oracle database is used, the OJDBC driver must be downloaded.
6. Copy the "ojdbc6.jar" file to the \extensions\jdbc-driver\oracle folder.
7. Run the "StartSonar.bat" file (Windows), located under the bin directory.
8. The properties are loaded and a message will notify that the process is up.

NOTE: If java version error is prompted, ensure a compatible Java installation is set in the JAVA_HOME environment variable.
9. Check the installation by opening a browser and introducing Sonar URL:
http://127.0.0.1:9000/

Installig SonarQube Scanner
SonarQube requires a launcher and SonarQube Scanner is the recommended one.1. Download SonarQube Scanner launcher.
2. Uncompress the package in a folder of your choice.
3. Edit the \conf\sonar-runner.properties file.
#Default SonarQube server
sonar.host.url=http://localhost:9000
sonar.jdbc.url=jdbc:postgresql://localhost/sonar
#Database settings:
sonar.jdbc.url=jdbc:oracle:thin:@localhost:1521/XE
sonar.jdbc.username=sonarqube
sonar.jdbc.password=<DB_password>
#Sonar credentials (by default admin/admin):
sonar.login=admin
sonar.password=admin
NOTE: It is important to assign the same port and context that were configured previously in the sonar.properties file.
4. Add to the 'path' environment variable the location of Scanner bin directory. Ex: C:\Sonar\sonar-runner-2.4\bin
5. Check the installation by opening a command window and running sonar-runner.bat

Analysing code
In order to analyse the code, the following steps must be performed:1. Navigate to your WebCenter application folder. Ex: C:\JDeveloper\mywork\CoherenceApp
2. Create a file named "sonar-project.properties".
3. Edit the file using this template and updating the values:
# must be unique in a given SonarQube instance
sonar.projectKey=CoherenceApp
# this is the name displayed in the SonarQube UI
sonar.projectName=CoherenceApp
sonar.projectVersion=1.0
# Path is relative to the sonar-project.properties file. Replace "\" by "/" on Windows.
# Since SonarQube 4.2, this property is optional if sonar.modules is set.
# If not set, SonarQube starts looking for source code from the directory containing
# the sonar-project.properties file.
sonar.sources=.
# Encoding of the source code. Default is default system encoding
#sonar.sourceEncoding=UTF-8
4. After saving the changes, open a command window and navigate to the directory of the application where the file was created.
5. Execute the command 'sonar-runner'.


6. Open the Sonar URL and login as administrator user.
7. The new project would appear in the Project dashboard.

8. Click on the project link and check the issues, which are classified depending on the severity.

9. Repeat the previous steps for all the WebCenter applications that you wish to analyse.
NOTE: In my case, I found problems with Serializable and Log errors, Sonar marked this type of errors although the code was perfectly compliant.
References
Oracle Database 11g Release 2 JDBC Drivers
Oracle XE Download page
Sonar
SonarQube Download page
SonarQube Installing the server
SonarQube Requirements
SonarQube Scanner Installing and configuring
Friday 30 October 2015
Integrating Oracle Coherence with WebCenter Portal
Oracle Coherence is the cache tool of Oracle and is intended to store frequently used data of applications. In the case of WebCenter Portal, this product is crucial to achieve a good performance of the platform, so it is strongly recommended to configure Coherence with Portal installations. In this post I include some guidelines and tips to integrate Portal and Coherence.
To cache those transactions, a generic application must be created using the CacheFactory class and others, which will implement the communciation with Coherence. Oracle official documentation provides a comprehensive guide to create a Coherence application here, including the
public void put (Object key, Object o,long time);
Where key is the identificator, o is the value and time is the storage time.
Oracle Coherence is so flexible that it allows developers to cache objects. For instance, it may be convenient to cache a whole java object with the response of a web service, which would include all the information of a customer.
In this case, it is important to assign proper expiration times for objects, otherwise users would receive old wrong data. Ideally, that time could be high (days or months) if the modification of the data is done via the Portal application too, so developers would execute cache flush of an object every time it is updated; therefore the cached data would always be correct. Problems arise when that data is updated by third-party applications, out of the scope of WebCenter Portal.
It is advised to have different cache repositories for different expiration time, so there would be one for objects with 1 hour expiration, another one for 1 day, etc. This is supposed to increase performance of the tool in large implementations.

Another choice is to use Enterprise Manager as monitoring tool, as described in this A-Team post.

Class CacheFactory
Coherence Monitoring Management in Oracle Enterprise Manager
Configure Coherence for Oracle WebCenter Portal Framework Content Presenter Task Flow
Oracle Coherence Overview
Testing a Coherence Installation
Using JMX to manage Coherence
Using WebCenter and Oracle Coherence Together – Discussion and How To
Testing Coherence Configuration
Once Coherence has been installed, the tool must be tested to check it is properly configured. This link provides a good step-by-step test.Integration with Content Presenter
Coherence is usually integrated with WebCenter Content via Content Presenter. This process is explained in detail by the A-Team in this post, basically it consists in editing the content-coherence-cache-config.xml file, create the jar library and add it to the Portal application. By configuring this, the retrieval of content from WebCenter Content would be reduced drastically by caching the Content Presenter items in Coherence.Caching WebCenter Portal transactions
Now that content is cached, page loading time would have decreased, but in order to really improve performance, transactions should be cached too. Portal is usually integrated with external web services, retrieving information from them, this type of transactions are costly in time, due to the network communication with the third party environment and its processing time.To cache those transactions, a generic application must be created using the CacheFactory class and others, which will implement the communciation with Coherence. Oracle official documentation provides a comprehensive guide to create a Coherence application here, including the
tangosol-coherence-override.xml file. This application will be deployed as JAR library and included in the libraries of the WebCenter Portal application. Once these methods are accesible from the application, simple invocations are implemented to store (put) and retrieve (get) from Coherence. public void put (Object key, Object o,long time);
Where key is the identificator, o is the value and time is the storage time.
Oracle Coherence is so flexible that it allows developers to cache objects. For instance, it may be convenient to cache a whole java object with the response of a web service, which would include all the information of a customer.
In this case, it is important to assign proper expiration times for objects, otherwise users would receive old wrong data. Ideally, that time could be high (days or months) if the modification of the data is done via the Portal application too, so developers would execute cache flush of an object every time it is updated; therefore the cached data would always be correct. Problems arise when that data is updated by third-party applications, out of the scope of WebCenter Portal.
It is advised to have different cache repositories for different expiration time, so there would be one for objects with 1 hour expiration, another one for 1 day, etc. This is supposed to increase performance of the tool in large implementations.
Coherence Administration Application
Cache administration could be undertaken using a simple ADF application, where all the cache objects are displayed in a table, along with buttons that would allow to flush the whole cache or a specific element. The implementation is not complicated, just using loops to get all the objects and functions to perform the actions. This is very useful when Portal administrators have the need to solve an issue regarding a wrong cached object, they could search for the element and flush it; another scenario is when a massive update is performed in the systems and the whole cache turns invalid, it can be flushed completely with just one click. Also, it might be interesting to include an 'Add' button to create objects using a form. Obviously, this application must be user protected so just granted users can access.
Monitoring Coherence
Coherence can be monitored using jConsole, the configuration needed is not complicated and it is detailed in this document. After that, jConsole will display Coherence MBeans and clusters.Another choice is to use Enterprise Manager as monitoring tool, as described in this A-Team post.

Conclusion
Considering the complexity of WebCenter Portal implementations, Oracle Coherence is a must to keep a good performance of the platform and reduce page load time. For example, the use of Coherence enabled a real Portal environment to reduce the loading time from 25 seconds to just 3.References
Building your first Coherence applicationClass CacheFactory
Coherence Monitoring Management in Oracle Enterprise Manager
Configure Coherence for Oracle WebCenter Portal Framework Content Presenter Task Flow
Oracle Coherence Overview
Testing a Coherence Installation
Using JMX to manage Coherence
Using WebCenter and Oracle Coherence Together – Discussion and How To
Tuesday 22 September 2015
Tracking web services calls in WebCenter logs
When invoking web services from WebCenter applications, it may be useful to track all the requests and responses generated in the application. In order to achieve this, some configuration in WebLogic console must be done:
1. Log in to WebLogic console as administrator user.
2. Navigate to WebCenter Portal managed server.
3. Select Configuration -> Server Start tab.

4. In the Arguments box, paste the following commands:
-Dcom.sun.xml.ws.transport.http.client.HttpTransportPipe.dump=true -Dweblogic.security.SSL.verbose=true -Dcom.sun.net.ssl.checkRevocation=false

5. Save and restart the managed server.
After that, in the out log file there will be traces with all the requests to web services, as well as their responses.
For instance:
---[HTTP request - http://<WS_Host>:6073/Service/CustomerManagement/Endpoint]---
Content-type: text/xml; charset=utf-8
Soapaction: "/Service/CustomerManagement.serviceagent/CustomerManagementEndpoint/GetServiceBillingAccounts"
Accept: text/xml, multipart/related, text/html, image/gif, image/jpeg, *; q=.2, */*; q=.2
<?xml version='1.0' encoding='UTF-8'?>
[..]
---[HTTP response - http://<WS_Host>:6073/Service/CustomerManagement/Endpoint - 200]---
null: HTTP/1.1 200 OK
Content-type: text/xml; charset="utf-8"
Content-length: 32026
Connection: keep-alive
Server: Jakarta-HttpComponents-NIO/1.1
Date: Thu, 17 Sep 2015 17:44:42 GMT
<?xml version="1.0" encoding="UTF-8"?>
It is important to note that this configuration is not recommended in Production environments, as it negatively affects the performance of the WebCenter platform.
Acknowledgement: Thanks to Roberto Fuertes Peña for his help.
1. Log in to WebLogic console as administrator user.
2. Navigate to WebCenter Portal managed server.
3. Select Configuration -> Server Start tab.
4. In the Arguments box, paste the following commands:
-Dcom.sun.xml.ws.transport.http.client.HttpTransportPipe.dump=true -Dweblogic.security.SSL.verbose=true -Dcom.sun.net.ssl.checkRevocation=false
5. Save and restart the managed server.
After that, in the out log file there will be traces with all the requests to web services, as well as their responses.
For instance:
---[HTTP request - http://<WS_Host>:6073/Service/CustomerManagement/Endpoint]---
Content-type: text/xml; charset=utf-8
Soapaction: "/Service/CustomerManagement.serviceagent/CustomerManagementEndpoint/GetServiceBillingAccounts"
Accept: text/xml, multipart/related, text/html, image/gif, image/jpeg, *; q=.2, */*; q=.2
<?xml version='1.0' encoding='UTF-8'?>
[..]
---[HTTP response - http://<WS_Host>:6073/Service/CustomerManagement/Endpoint - 200]---
null: HTTP/1.1 200 OK
Content-type: text/xml; charset="utf-8"
Content-length: 32026
Connection: keep-alive
Server: Jakarta-HttpComponents-NIO/1.1
Date: Thu, 17 Sep 2015 17:44:42 GMT
<?xml version="1.0" encoding="UTF-8"?>
It is important to note that this configuration is not recommended in Production environments, as it negatively affects the performance of the WebCenter platform.
Acknowledgement: Thanks to Roberto Fuertes Peña for his help.
Friday 7 August 2015
Data source drivers for ADF applications
Recently I found an error in an ADF 12c application in Production which was prompting error popups to users all the time. In the managed server log files, the following trace was registered:
oracle.jbo.SQLStmtException: JBO-29114 ADFContext is not setup to process messages for this exception.
[..]
Caused By: java.sql.SQLException: Statement cancelled, probably by transaction timing out
Firstly, I checked data source connectivity from WebLogic console, but the result was successful.

Then I found this post and this one, where the source of the problem was attributed to the data source driver. Despite the common practice of assigning JDBC XA drivers to data sources connections, this should not be used with Oracle Fusion applications, as it is documented here, because they are not compatible, "XA data sources close all cursors upon commit" and that produces errors. As that data source was using that type of thin XA driver (oracle.jdbc.xa.client.OracleXADataSource), I decided to change it.
As the list of driver types is only displayed when creating a new one, nd I did not know the exact name, I decide to create a new mock data source, just to get that value, which was:
Description: Oracle's Driver (Thin) for Instance connections; Versions:Any
Name: oracle.jdbc.OracleDriver

Once I knew the name, I edited the current data source with that driver name. However, I could not activate changes, because an error was received, it was related to not been able to update de data source configuration file.

The workaround consists in changing manually that configuration file. Navigate to the following folder in the domain server:
<adf_domain_dir>/config/jdbc
Create a backup copy of the file with the data source name and edit the original one. Just update the parameter related to driver-name:
<driver-name>oracle.jdbc.OracleDriver</driver-name>
After this, the error disappeared from the production environment.
Don't Use Oracle's Driver (Thin XA) to Define WebLogic Data Source for ADF Applications
ADF: Resolving random JBO-27122 and closed statement errors
What You May Need to Know About JDBC Data Source for Oracle WebLogic Server
oracle.jbo.SQLStmtException: JBO-29114 ADFContext is not setup to process messages for this exception.
[..]
Caused By: java.sql.SQLException: Statement cancelled, probably by transaction timing out
Firstly, I checked data source connectivity from WebLogic console, but the result was successful.

Then I found this post and this one, where the source of the problem was attributed to the data source driver. Despite the common practice of assigning JDBC XA drivers to data sources connections, this should not be used with Oracle Fusion applications, as it is documented here, because they are not compatible, "XA data sources close all cursors upon commit" and that produces errors. As that data source was using that type of thin XA driver (oracle.jdbc.xa.client.OracleXADataSource), I decided to change it.
As the list of driver types is only displayed when creating a new one, nd I did not know the exact name, I decide to create a new mock data source, just to get that value, which was:
Description: Oracle's Driver (Thin) for Instance connections; Versions:Any
Name: oracle.jdbc.OracleDriver

Once I knew the name, I edited the current data source with that driver name. However, I could not activate changes, because an error was received, it was related to not been able to update de data source configuration file.
The workaround consists in changing manually that configuration file. Navigate to the following folder in the domain server:
<adf_domain_dir>/config/jdbc
Create a backup copy of the file with the data source name and edit the original one. Just update the parameter related to driver-name:
<driver-name>oracle.jdbc.OracleDriver</driver-name>
After this, the error disappeared from the production environment.
References
Don't Use Oracle's Driver (Thin XA) to Define WebLogic Data Source for ADF Applications
ADF: Resolving random JBO-27122 and closed statement errors
What You May Need to Know About JDBC Data Source for Oracle WebLogic Server
Friday 31 July 2015
Invoking Web Services from WebCenter Portal
It is very common to find
clients relying on web services to perform actions across different platforms,
such as Siebel, data warehourse or content repositories. When implementing an
Oracle WebCenter Portal installation, those web services must be integrated via
WebCenter applications. This post explains how to achieve it.
1. Create a Project for the new web service proxy. I recommend to mantain one project for web service, because there could be conflicts between them.
2. Add a Web Service Proxy Client. In this case I am using JAX-WS style.

 3. Introduce URL to web
service. It is recommended to select the option "Copy WSDL intro
project".
3. Introduce URL to web
service. It is recommended to select the option "Copy WSDL intro
project".

4. Define packages for this client. In this step there could be an error regarding classes conflict, if this is the case, I recommend to leave the packages blank.

5. Select default settings in methods.


6. No policies are usually needed.
7. Continue with default values until the last window, where the actions are summarised.


Once the client is created, it should be tested by inserting code in the main method of the endpoint class (<WS_Name>EndpointClient.java) and executing it with the Run option. This quick check will determine if the connection is fine.

1. Create a new java class named Invoker<WS_Name>.java. This should be created in the root package of the proxy and will invoke operations generated by the client. In this class the input parameters of the service are sent and the output objects are created.
2. In this new class, an invoke function is created per service, where the input parameters are inserted in the input object, then it is sent to a function in the Enpoint class. Example:
public static WSOutputQueryMobileTransactions invokeMobileTransactions(String mobileNumber, String queryType, String startDate, String correlationID ){
MobileBalanceQueriesEndpointClient mobileTransaction = new MobileBalanceQueriesEndpointClient();
InputQueryMobileTransactions input = new InputQueryMobileTransactions();
input.setMobileNumber(mobileNumber);
input.setQueryType(queryType);
input.setStartDate(startDate);
return mobileTransaction.invokeMobileTransactions(input,correlationID);
}

3. Once the invokers are defined, in the Endpoint class functions are created where the request is built, putting together the input object from the Invoker class and other header parameters. Finally, the request is sent to the Soap.java class which communicate with the web service and return its response. Example:
public static WSOutputQueryMobileTransactions invokeMobileTransactions ( InputQueryMobileTransactions input,String correlationID){
mobileBalanceQueriesServiceagent = new MobileBalanceQueriesServiceagent();
Soap soap = mobileBalanceQueriesServiceagent.getMobileBalanceQueriesEndpoint();
((BindingProvider)soap).getRequestContext().put(BindingProvider.ENDPOINT_ADDRESS_PROPERTY , Properties.getInstance().getValues().get("URL_ENDPOINT_MOBILE") + "/Service/MobileBalanceQueries.serviceagent/MobileBalanceQueriesEndpoint/QueryInvoiceValue");
// General Request
WSInputQueryMobileTransactions request = new WSInputQueryMobileTransactions();
// Header parameters are created and added
WSRequestHeader cabecera = new WSRequestHeader();
WSRequestHeader.System system = new WSRequestHeader.System();
system.setCorrelationID(correlationID);
system.setValue("Portal");
system.setProcessingServer("Test");
cabecera.setSystem(system);
// Header and input parameters are put together
request.setWSRequestHeader(cabecera);
request.setInputQueryMobileTransactions(input);
//Web Service is invoked with the request
return soap.queryMobileTransactions(request);
}

4. The main method in the Endpoint can be used to test the functions. Example:
public static void main(String[] args)
{
try
{
WSOutputQueryInvoiceValue resp = new MobileBalanceQueriesEndpointClient().invokeInvoiceValue("3057000973", "1");
System.out.println(resp.getWSResponseHeader().getService().getStatus());
}
catch(Exception e)
{
e.printStackTrace();
}
}

Eventually, a JAR library needs to be generated from the project and it will be added to the WebCenter Portal application, where web services will be invoked via the Invoker class.
Tutorial: Creating a Web Service Proxy
Creating Web Services Proxy in JDeveloper
Creating Web Service Proxy
Firstly, a WebCenter Portal application needs to be created in jDeveloper. In this case I used jDeveloper 11.1.1.7.0 with WebCenter extensions. Once it is created, the following steps must be performed:
1. Create a Project for the new web service proxy. I recommend to mantain one project for web service, because there could be conflicts between them.
2. Add a Web Service Proxy Client. In this case I am using JAX-WS style.


4. Define packages for this client. In this step there could be an error regarding classes conflict, if this is the case, I recommend to leave the packages blank.

5. Select default settings in methods.


6. No policies are usually needed.

7. Continue with default values until the last window, where the actions are summarised.


Once the client is created, it should be tested by inserting code in the main method of the endpoint class (<WS_Name>EndpointClient.java) and executing it with the Run option. This quick check will determine if the connection is fine.

Implementing Web Service Methods
The next step is to create the methods that will invoke web service for the WebCenter application.
1. Create a new java class named Invoker<WS_Name>.java. This should be created in the root package of the proxy and will invoke operations generated by the client. In this class the input parameters of the service are sent and the output objects are created.

2. In this new class, an invoke function is created per service, where the input parameters are inserted in the input object, then it is sent to a function in the Enpoint class. Example:
public static WSOutputQueryMobileTransactions invokeMobileTransactions(String mobileNumber, String queryType, String startDate, String correlationID ){
MobileBalanceQueriesEndpointClient mobileTransaction = new MobileBalanceQueriesEndpointClient();
InputQueryMobileTransactions input = new InputQueryMobileTransactions();
input.setMobileNumber(mobileNumber);
input.setQueryType(queryType);
input.setStartDate(startDate);
return mobileTransaction.invokeMobileTransactions(input,correlationID);
}

3. Once the invokers are defined, in the Endpoint class functions are created where the request is built, putting together the input object from the Invoker class and other header parameters. Finally, the request is sent to the Soap.java class which communicate with the web service and return its response. Example:
public static WSOutputQueryMobileTransactions invokeMobileTransactions ( InputQueryMobileTransactions input,String correlationID){
mobileBalanceQueriesServiceagent = new MobileBalanceQueriesServiceagent();
Soap soap = mobileBalanceQueriesServiceagent.getMobileBalanceQueriesEndpoint();
((BindingProvider)soap).getRequestContext().put(BindingProvider.ENDPOINT_ADDRESS_PROPERTY , Properties.getInstance().getValues().get("URL_ENDPOINT_MOBILE") + "/Service/MobileBalanceQueries.serviceagent/MobileBalanceQueriesEndpoint/QueryInvoiceValue");
// General Request
WSInputQueryMobileTransactions request = new WSInputQueryMobileTransactions();
// Header parameters are created and added
WSRequestHeader cabecera = new WSRequestHeader();
WSRequestHeader.System system = new WSRequestHeader.System();
system.setCorrelationID(correlationID);
system.setValue("Portal");
system.setProcessingServer("Test");
cabecera.setSystem(system);
// Header and input parameters are put together
request.setWSRequestHeader(cabecera);
request.setInputQueryMobileTransactions(input);
//Web Service is invoked with the request
return soap.queryMobileTransactions(request);
}

4. The main method in the Endpoint can be used to test the functions. Example:
public static void main(String[] args)
{
try
{
WSOutputQueryInvoiceValue resp = new MobileBalanceQueriesEndpointClient().invokeInvoiceValue("3057000973", "1");
System.out.println(resp.getWSResponseHeader().getService().getStatus());
}
catch(Exception e)
{
e.printStackTrace();
}
}

Eventually, a JAR library needs to be generated from the project and it will be added to the WebCenter Portal application, where web services will be invoked via the Invoker class.
References
Tutorial: Creating a Web Service Proxy
Creating Web Services Proxy in JDeveloper
Subscribe to:
Posts (Atom)